Wednesday 28 February 2018

TM100 Transponder Key Chip Programmer

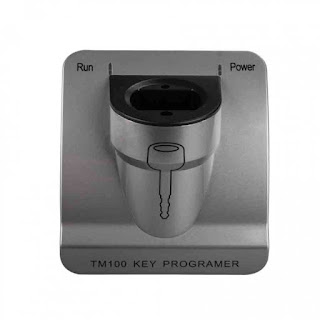
V3.20 TM100 transponder chip programmer is the newest transponder and car key programmer as the professional locksmiths tool for your choice. And V3.20 TM100 transponder chip programmer is developed to cover, read, write and generate the universal transponders chip

Why is TM100 transponder key programmer with 62 module necessary for locksmith?

TM100 transponder key programmer supports total 62 modules, all key lost for Toyota/Lexus all system keys, BMW CAS1,CAS2,CAS3,CAS3+, Ducati motocycle, Audi EZS Megamos 8Eand, and full transponder including Philips transponders, Temic transponders, Megamos transponders, Texas transponders, and also generates images for many different original transponders like Philips ID33, Philips Crypto for different ID’s and Texas crypto. Moreover, TM100 transponder key programmer is cheap and easy to operate for you do not need any additional diagnostic equipment to program the generated transponder to the car and It will start the car directly; that is , the only thing you have to do is to write the new file back into the immobilizer system. Besides, it has the special function for reading the kilometers, VIN and transponder type for all BMW keys was added to the BMW software module! Immo pin code is also displayed for some car models.

What’s new for V3.09 TM100 transponder key programmer?

1. Add keymaker: China vehicle, Delphi Immobox, 93C66, ID48. Models: GreatWall Hover,Wingle,Voolex C10,C20,C30,V200,V240,X240, ZhongHua;
2. Bugs fix;
Notes:

EEPROM is 93C66B, SOT-23. You can read it by XProg using Microchip 93xx66B. The wire schematic from 6-PIN to 8-PIN can be got from technical support;


Tuesday 27 February 2018

Where to Find The Best Way of Updating K-TAG ECU Programming Tool Master

K-TAG ECU programming tool master has update to its newest version V6.070. and KTAG chip tuning tool is an professional and universal ECU programmer,China ktag master remove tokens limitation, K-suite k-tag support almost protocols: BDM, BOOT, K-line, CANBUS and so on. KTAG master ECU programmer can be used to read and write most ECU in the market.

Here is the instruction for how to update K-tag master V2.13 firmware V6.070.

NOTE:
During a download/update:
DO NOT unplug the USB cable.
DO NOT turn off your computer.

How to Update Operating Manuals

It is important to periodically check if new Operating Manuals have been released and / or updated.

To check the availability of new Operating Manuals and download them:

1. Connect K-TAG to your computer by using the supplied USB cable.
2. Launch the K-Suite software.
3. Click on the Help button in the main window of the K-Suite software.
4. Click on Check.
5. If the green check mark is displayed it means that the manuals are updated; if there is no green check mark, click on Download to download the latest manuals.


Always check the availability of new Operating Manuals and possibly download them after an update of the K-Suite software.

How to Update the K-Suite software and K-TAG V2.13 Firmware V6.070

If your computer is connected to the Internet, when launched the K-Suite software automatically searches for available software updates. To update the K-Suite software and download any new protocols published

1. Connect the K-TAG to your computer using the supplied USB cable.
2. Start the K-Suite software and do not press SKIP on the loading screen of the software.
   1). Follow any onscreen instructions.
   2). Wait until the update is complete.

K-Suite software updates include:


* K-Suite software updates, available for free for any owner of K-TAG.
* Updates to the protocols enabled at the time of purchase of the tool, available for free even after expiration of your subscription.
* New protocols developed and distributed by Alientech Srl, available only for users with an active subscription.

More car ECU programmer update information, you can click our website: www.vipprogrammer.com. to know more update version

Monday 26 February 2018

How Much Don’t We Know About Car Key Pro M8 MVP Key Programmer

Key pro M8 is a very useful auto key programmer. So it is almost everywhere in almost every auto repair shop. But today, what’s important is the introduction of Key Pro M8 Update Tokens Manual


Here is Key Pro M8 Update Tokens Manual

1.  Send us the M8 serial number, within 24 hours, we will notify you when you can update token.
2. connect your computer to network, and then use the USB cable to connect the M8 and the computer.
3. Plug the power supply cable into the M8, and then turn on M8 till the following window appears.
4. The window “Found New Hardware Wizard” popup, tick off “Install from a list or specific location (Advanced)”, and then click “Next”.
5. tick off “Search for the best driver in these locations” and “Include this location in the search”, and then click “Browse” to choose the installation location.
6. After click “Browse”, choose the driver location: browse for Folder-Desktop-The key pro (M8) driver-OK.
7. click “Continue Anyway”.
8. please wait while the wizard installs the software…
9. click “Finish” and the wizard complete installing the software for the key Pro M8.
10. stay in the following window even some change happens during the process.
11. click “M8 Tool.exe” to show as below, “Serial Number” will be automatically indentified, input M8 6-digit password and click “Login”.
12. in the drop-down list of “select TOKEN quantity” choose the TOKEN quantify you bought from the dealer, double click “Update TOKEN”.
13. a window popup reading “Update TOKEN finish!”
14. wait until you see the Current TOKEN number already includes that you bought, and click “Finish”.


Finally , you can download and save the new-key-pro m8 auto key programmer update token manual:
https://www.slideshare.net/ourprogrammerJohn/new-key-prom8autokeyprogrammerupdatetokenmanual

Friday 23 February 2018

DIY: The Instructions of OBDSTAR BT06 Cars and Trucks Battery


there are too many details about Obdstar BT06, first, it is car battery electronical testers, and Obdstar BT06 is easy, quick and accurate. This article will introduce to you the very details you didn’t know, which contains the results of charging system test.

Guide:
Connect OBDSTAR BT06 device with the battery
Put the red and black clamp to the battery to be tested. Red clamp for positive, black clamp for negative. It will show start-up interface on the screen.

The voltage of the battery to be tested should be lower than 6.0 V or the normal test is unable to proceed; Press OK to continue.


Follow the prompt of the BT06 device, select in proper order

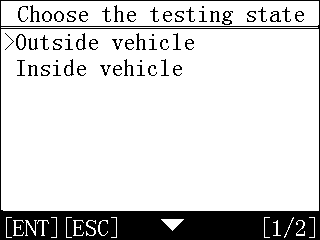
Step1: Choose the testing state

It refers to if the battery is inside the vehicle with load connected. If so, choose [Inside vehicle]. If not, choose [outside vehicle].


Step2: Choose charge state

It refers to if the charge of the battery is finished. If so, choose [After charge]. If not, choose [Before charge].


Step3: Choose battery type

It refers to the battery type. Choose [Normal battery] in general.


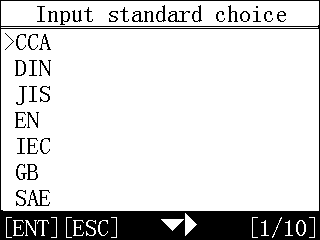
Step4:Choose input standard


It refers to the factory marked standard for the battery, which is shown on the right above or the front battery. Choose the marked standard, such as CCA, JIS and etc.
If there is no standard shown, please select GB standard and input the Ah value to test. The error will be less when selecting GB standard.


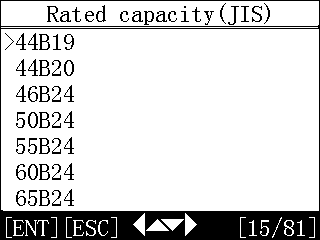
Step5: Choose rated capacity


It refers to factory starting current standard, which is shown on the right above or the front battery. Such as 55B24.


Step6: Press ok to begin the test

Test results interpretation


Tip:
Notice: For some batteries in deep lack of power (the vehicle is not used for a long time, batteries are not charged in time; battery is in deep lack of power because of not turning off lamp and door that can not start the vehicle and etc), there will be a prompt “please replace the battery”. For this kind of battery, please consult with the battery manufacturer fist and replace and charge the battery according to the method given by the manufacturer, and then begin the test.
Start system test

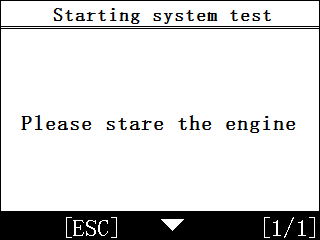
Step1: After the battery test is finished, please press [OK] to enter starting system test if the testing state is inside vehicle as shown below.


Step2:
Start the engine according to the prompt and the device will finish the starting system test automatically and show the result.


Step3: Test result includes start time, start voltage and voltage state.(In general, start voltage lower than 9.6v is abnormal, higher than 9.6v is normal.)


Step4: If the starting system test is abnormal, the battery test results are displayed.


In this way, the maintenance personnel can quickly determine the overall condition of the starting system according to this data.
Charging system test

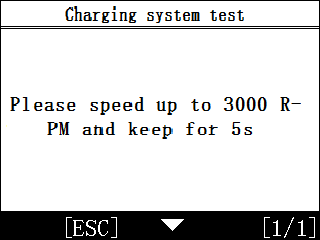
(1) After starting system test is finished, please press [OK] to enter Charging system test and operate according to the prompt and “please seep up to 3000 RPM and keep for 5s”


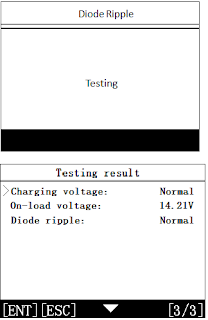
(2) After test is finished, the device will show charging voltage, on-load voltage and diode ripple as shown below.


Notice:
If the device can not detect the engine speed, there is probably something wrong with the engine regulator or the connection breakdown with the battery. If the device can not detect the charging voltage, the device can skip the engine speed test, then the result will show “No voltage input”. Please check the connection between engineer and battery and then test again.

Results for charging system test

Charging voltage: normal
The charging system shows that the output of the generator is normal and no problems are detected.

Charging voltage: low
Insufficient charging voltage of charging system
Please check whether the generator belt is skidding or disconnecting, check whether the connection between the generator and the battery is normal.
If the transmission belt and circuit is connected well, please troubleshoot the generator according to the manufacturer’s suggestion.

Charging voltage: high
The voltage for generator output is too high.
As most generators in the cars use a built-in regulator, it needs to replace the generator assembly (some older cars which use external regulators, please replace the regulator directly).
The limit of usual high voltage limit in a car regulator is 14.7v. Charging too high will make the battery go through charging, thus shortening the life of the battery and causing it to malfunction.

No voltage output:
The generator voltage output is not detected. Table check whether generator connections and generator belts are normal.

Diode testing:
The tester can detect whether the diode is normal by charging current waveform. If the diode wave voltage is too high, then at least one diode has been damaged, please check and replace the diode. So far, the test is completed.







Friday 2 February 2018

Have you heard of aftermarket ECU

You may didn’t hear of aftermarket ECU, but don’t worry, i have collected some information to help you. First, please allow me to introduce to you the definition and introduction of it.

The ECU ( electronic or engine control unit) controls many aspects of the modern engine. It takes readings like the intake air temperature and mass, amount of oxygen in the exhaust, engine load, rpm and other factors to calculate the optimum duration and timing of the spark and amount of fuel needed.

Manufacturers are fairly conservative in setting up to make the car run reliably under harsh conditions. These unfavorable conditions range from poor fuel to missing maintenance intervals and are generally overlooked. It is worth noting that two identical engines are rare. 20% difference in power has been noticed on the same engine in the plant!

We have seen that this should essentially be a huge difference between the power output and the curve of the same block, highlighting the need for a hard job for manufacturers of all ECU.

For this reason alone, there is a good reason to improve and tighten the timing. When you add other tuning components and other modifications to the mix, upgrading the ECU becomes critical.

Some modern ECU have a degree of self-learning capability and adjust fueling and timing based on the data read over a reasonable distance. This is better than a fixed set of parameters, but still needs improvement, especially if you make other changes.

Unfortunately, ECU need to be reprogrammed, although some engines are too old. Even if some engine ECU are protected or locked, they can not be changed.

One answer is to add an aftermarket ECU. This effectively replaces the car's standard ECU and allows users to write customized fuel and time charts. Turbo engines are even more advantageous when used in conjunction with electronically controlled step-up controllers.

Do not confuse the aftermarket ECU with a knuckle-mounted ECU or plug-in case. We are discussing a complete engine management system that is suitable for adding to older hydrocarbon engines converted to fuel injection and also for upgrading vehicles with non-remappable ECU (mostly manufactured before 2001).

There are a lot of benefits. A standard NASP engine can see a power gain of up to 10%, and you can realize these potentials if you add other changes. The turbocharged engine gains even more, at around 30% extra power, and even more mod There are many types of after-market electronic control units. The basic
electronic control unit controls the fueling and timing of the 4-cylinder engine. More sophisticated is the V8 management, faster processing and finer control. A good example of how to get the best out of these settings is that you should use a rolling road. This allows you to see what the engine is doing at any time and easily diagnose lean or rich health and other potential problems.

If your ECU is set incorrectly, it is easy to damage your engine. Wrong sparks, excessive fueling or other problems can literally rip an engine. The immobilizer and other settings on some cars (windows, air conditioning, and even some car gearboxes) are also controlled by the ECU so in some cases you may need to bypass these devices or find a way to keep the car standard ECU Pleased, while aftermarket and engine management actually work.