Friday, 31 August 2018

How to Fix Any Water Damaged Mobile Phone

In your daily life, what should you do when your phone dropped to water, sometimes, maybe it cannot be used again, but normally, you can still use it just need to repair it

Solution 1. Don't turn on the iPhone

 
When your iPhone dropped into the water, you should keep in mind that don't turn on the device, immediately. Maybe your device would turn off after being damaged by water, no matter when, don't turn it on manually at this time. When you turn on it, if the water has reached inside the device, it might cause more damage to your phone than good. So, in order to minimize the damage your phone receives, it is best not to open your iPhone.
 
Solution 2. Remove the iPhone case
 
The next step is removing any protective case, if your iPhone has them. The iPhone case at other times will play a protective role for our iPhone, but after the iPhone into the water, you must take it off.
 
Solution 3. Remove the iPhone SIM card
 
When you turn off your iPhone, you must make sure the water won't damage the SIM card. So you must remove the headphones and the SIM card tray on the iPhone side, the Sim ejector tool will help you. In addition, don't insert the tray back and leave the slot open.


Solution 4. Handle water stains
 
You must wipe the iPhone exterior, taking the assistance of cotton cloth. Don't apply too much pressure while wiping the phone to minimize the iPhone water damage, it can avoid spreading the liquid around.
 
You can shake the iPhone and you can blow into the iPhone openings. You can also try compressed air or a blow dryer on cool. You can also try using a wet / dry vacuum to suck the water out.
 
Solution 5. Put the iPhone in a dry place
 
After clearing its exteriors, you need to place the iPhone in a warm and dry place. This would evaporate the water content that is inside the iPhone.

Don't make it exposes to too much sunlight, instead put it on the top of a TV or a monitor. It can protect your iPhone won't get damaged due to extreme exposure to sunlight.
 
Solution 6. Repair it
 
When done the above steps, the last step is repairing the water damaged iPhone. You must repair it by yourself or other professional phone repair man. They will use a lot of mobile repair tools to resolve your iPhone. Such as the VIPFIX phone toolkit to disassembly the iPhone, the titanium alloy tweezers to check the phone parts and components, the LCD screen suction cup to open the iPhone LCD, the VC890D digital multimeter to measure the current, the SAIKE 898D soldering iron to weld the motherboard chip, etc.

What Need Attending of ipad Touch Screen Assembly

When you need to assemble the ipad touch screen, you need to pay attention to these important points, or you may damage your ipad, so you must need learn some skills when you need to repair it

Glass Sampling

 
All REWA glass lens have to go through tough tests like bending test, drop test, hydrophobic effect test, etc. to ensure the outstanding quality.

iPad Touch Screen Assembly Sample Groups
 
During glass sampling process, there are three sample groups for comparison.
 
Group (A)——REWA AAA Grade
Group (B)——OEM New
Group (C)——Prevail on the Market

1. Bending Test
 
Run bending test on iPad Touch Screen Assembly groups (A), (B) and (C) respectively.
 

Max Bending Force Value:
 
Group (A)——72.86kgf
Group (B)——78.16kgf
Group (C)——30.76kgf

Bending Test Result:
 
Group (A)——Good
Group (B)——Excellent
Group (C)——Poor

2.Drop Test
 
Run drop test on iPad Touch Screen Assembly groups (A), (B) and (C) respectively. Each sample goes through three times continuously.
 

Max Drop Strength Value:
 
Group (A)——90cm/90g
Group (B)——90cm/90g
Group (C)——80cm/65g

Drop Test Result:
 
Group (A)——Excellent
Group (B)——Excellent
Group (C)——Poor

3.Dimension Measurement


Thickness parameters of iPad Touch Screen Assembly groups (A), (B) and (C) are as following:
 
Group (A)——0.57mm
Group (B)——0.56mm
Group (C)——0.58mm

4.Hydrophobic Effect Comparison


5.Light Transmittance Test
 
Before the test, tear off the protective film and run cosmetic inspection of iPad Touch Screen Assembly groups (A), (B) and (C). After that, run Light Transmittance Test under dimly lit environment.


Visible light transmittance value of Camera hole (550nm) :
 
Group (A)——95%
Group (B)——95%
Group (C)——92%

Visible light transmittance value of the touch panel Functional area  (550nm):
 
Group (A)——92%
Group (B)——93%
Group (C)——92%

6.Home Button Alignment


Install home button for a look——all glass lens fit perfectly well.

To conclude:
 
Group (A) runs with a good performance during all those tests. REWA AAA Grade proves to be qualified for the following assembly producing process.

How to Buy iPhone Nand Test Fixture in a Rapid Way

You need different kinds of nand test fixture which can support can support all of the iPhone or iPad? The answer is no. Different iPhone models has different iPhone Nand flash or other chips, their pins or positions are not the same, so we need to use a different programmer to fix these chips. How to buy them with the most cost-effective? Here is the buyer guide.


1. JC Pro 1000S Programmer + different modules

If you have enough budget,then you can choose JC Pro 1000S Chip programmer. JC Pro 1000S is the multi-functional iPhone/iPad chip programmer, it has a JC Pro 1000S main unit and 13 modules to suit your different needs.

What are the JC PCIE main unit and 13 modules?What's the price for them?

JC PCIE Main Unit: about 199USD

2-IN-1 Baseband EEPROM IC Module (6/6p+6s/6sp): about 118USD

2-IN-1 Logic EEPROM IC Module (6/6p+6s/6sp): about 118USD

32/64Bit NAND Module: 101USD

Baseband chip Module (Qualcomm/ inter,7-7P): about 67USD

Baseband EEPROM IC Module (4-5s): about 67USD

Batter tester module: about 47USD

Data cable module: about 15USD

EEPROM IC Socket module: about 63USD

Headphone Cable module: about 33USD

iPad 2/3/4 module: about 186USD

Logic / Baseband EEPROM IC Module (7-7P ): about 67USD

PCIE (6S-7P, iPad pro) NAND Module: about 382USD

PCIE-8 8/8P/X NAND Module: about 611USD

For example:

If you want to repair or programmer iPhone Nand flash for iPhone 5S-X, you can choose JC Pro 1000S main unit, 32/64Bit NAND Module, PCIE (6S-7P) module and PCIE (8-X) module, the total price of this combination is about 1293USD.


2. NAVIPLUS PRO3000S + JC PCIE+ JC PCIE-8

If your funding is limited, and you want to repair or program the iPhone Nand flash, one of the options is choose NAVIPLUS PRO3000S , JC PCIE and JC PCIE-8.

PRO 3000S supports iPhone 5S to iPhone 6 Plus, its price is about 185USD

JC PCIE supports iPhone 6S to iPhone 7 Plus, its price is about 390USD

WL PCIE-8 supports iPhone 8 to iPhone X, its price is about 600USD

The total price of this combination is about 1175USD

3. NAVIPLUS PRO3000S + WL PCIE+ WL PCIE-8

If your budget is still not enough, such as less than 1100USD, then you can choose this combination, NAVIPLUS PRO3000S, WL PCIE and WL PCIE-8.

PRO 3000S supports iPhone 5S to iPhone 6 Plus, its price is about 185USD

WL PCIE supports iPhone 6S to iPhone 7 Plus, its price is about 360USD

WL PCIE-8 supports iPhone 8 to iPhone X, its price is about 500USD

So, the total price of this combination is about 1045USD

Many people will ask that what's the difference between JC PCIE and WL PCIE, actually, their function is the same, and the biggest difference is that they come from different manufacturers, one is JC, and one is WL. However, why JC PCIE is more experience than WL PCIE?  First we need to understand that this is not the cause of quality,the quality of both of them is good. The JC is a series of products, it has a variety of adapters, about the details please refer to JC pro1000s, and the WL modules are relatively single, so the JC PCIE pricing is higher than WL.

Summary:

If you don't have enough budge, and you just want the Nand test fixture to repair or program the iPhone Nand flash, then you can choose NAVIPLUS PRO3000S + WL PCIE+ WL PCIE-8.

If you have enough budge, and you just want the Nand test fixture to repair iPhone Nand flash, then you can choose NAVIPLUS PRO3000S + JC PCIE+ JC PCIE-8.

If you have enough budge, and you want to repair or program the different iPhone chips, you can choose JC Pro 1000S Programmer + different modules.


Thursday, 30 August 2018

How to Repair iPhone 6 LCD Screen Display

What should you do when you need to repair the iphone 6 LCD screen display. Turn on iPhone 6 to test, the iPhone LCD screen doesn't display. Disassemble the iPhone motherboard, and observe it under the Stereo Zoom Microscope, we found there are many solder paste on iPhone display socket and iPhone touch socket.


Is the iPhone LCD screen not display because the socket is not clean? First we use BGA clean water to clean the iPhone motherboard. Because the customer said that iPhone LCD screen also is half bright and half the screen black state, so, after cleaning, we can use digital multimeter to measure the grounding resistance value for the J2019 display socket 1 pin PP_LCM_BL_CAT2_CONN and 4 pin PP_LCM_BL_CAT1_CONN, these two pins will cause iPhone screen half bright and half black problem. We found the resistance value of 4 pin is 2111, which is abnormal, the normal resistance value is about 570.


After a short connection of the FL2025 fuse inductor, the resistance tested is normal.


Assemble the iPhone display screen and test it, the Apple logo can be displayed normally, but the backlight still not bright. We noticed that the CPU shield cover was been moved, remove the CPU shield cover, we found the CPU was been repaired. Now, it's easy to explain, the U1502 backlight IC is virtual welded when blowing the CPU by QUICK 861DW hot air rework station, and it leads the iPhone LCD screen sometimes bright and sometimes not. Also, there are many solder paste and tin balls, which is easy cause iPhone motherboard to short circuit.


Clean up the tin balls and solder paste, and then remove the iPhone backlight IC. There is a good way to remove the iPhone backlight IC, remove the three filter capacitors above the backlight IC, and then the iPhone backlight IC is easy to remove.


Reballing tin and then install the chip, assemble the iPhone and test it, the fault has been solved.

How Much Do You Know About Professional Phone Repair Shop

There are many high quality phone repair tools are needed when you need to repair the phone. So i recommend you some hot sale products on our store. Hope it useful

1. VIPFIX IPhone X 8 8P Precision Screwdriver Set Mobile Phone Opening Tool


VIPFIX iPhone 8 8Plus X Precision Screwdriver Set, high quality Mobile Phone Teardown Opening Repair Tool, iPhone 8 8Plus X Screwdriver is designed with new generation technology: S2 steel and aluminum alloy handle, the long batch pole will offer you more convenient and accurate operation when repairing iPhone 8 8 Plus and iPhone X. The Pentagonal 0.8 / Cross 1.3 / Pinhead Phillips 2.5 / Y 0.6 screwdriver tip can available for different iPhone / Mobile Phone screws.

Material: S2 steel + aluminum alloy handle
Size:overall length 126mm, batches length 30mm (manual measurement)
Type: Pentagonal 0.8 / Cross 1.3 / Pinhead Phillips 2.5 / Y0.6
Advantages: new generation technology which faces market at the same time with iPhone 8 X, durable, small portable handy handle, rotating nut, convenient operation. Long batch bar, good sense of holding, high quality.

 
2. ADSM201 1080P HDMI Digital Microscope For Phone Circuit Board Repair


Vipprog ADSM201 1080P HDMI digital microscope for Broken Phone Circuit Board Repair, VAG / HDMI Electronics Microscope for Phone Circuit Board Soldering, HD Digital Electronic Microscope for phone Circuit Board Repair.

Features:
 
Image sensor: 3 Mega Pixels
Video output: 1080p Full HD
Video format: MOV
Photo format: JPEG
Focus Range: Manual focus from 10mm to 500mm
Frame Rate: Max 30f/s under 600 Lus Brightness
Magnification Ratio: 10x to 300x
Video-output Interface: HDMI, to any monitor with HDMI-In
Storage: MicroSD card, up to 32G
Power source: 5V DC

3. GSM IP Universal Test Card For Iphone Ipad SIM Card Signal Testing Diagnosis

IP universal test card support almost GSM SIM card: Mobile Telecom Unicom three-network universality, IP universal test card fit for apple series (iphone or SIM version ipad), IP universal test card adopt immersion gold process and not easy to wear. place Nano SIM card of any operators to test your mobile phone signal without a card tray repair tool
 
How to use IP universal test card
 
1. Insert the commonly used three major operators nano sim into the three card slots
2. Making the front of the slot surface toward you, and insert it horizontally into the SIM cart slot
3. Swith SIM. Adjust the switch to any of the three ABC gears to be used. The operator to be tested simultaneously pulls out the entire test deck and pushed it in to re-detect the new operator
4. There is a nano sim card pin test point on the test card deck, which is convenient for repairing the mobile phone without reading the card for quick detection. When testing the signal of SIM card at the test point, it is necessary to turn off the phone and measure the ground resistance. When the phone is turned on, the voltage signal and waveform can be tested.

4. BK-108 Mini Pliers Cutter Phone Repair Jumper Wire Nipper Hand Tool

BK-108 nipper hand tool for repair the phone jumper wire. BK-108 Mini Pliers can expand 150 degree, making you operate more fast and convinent when you need to cut the jumper wire, tin wire or other precision wire on the electronic circuit board. BK-108 stainless steel cutter with low zinc on the outer surface can anti-oxidize, and high hardness metal material is suitable for cutting alloy metal

5. IPhone 8 8P X LCD Screen EEPROM Photosensitive Data Backup Programmer


iPhone 8 8P X LCD screen EEPROM photosensitive data programmer, the photosensitive data can be readed & writed on iPhone 8/8P/X LCD screen , which can backup to the computer, even if the LCD screen is lost, as long as you have the data, it can also be used after replacing the screen in the future, It can only be used when there is original screen, since you have to read the data from the original screen and re-write it to the assembly screen.

What to Do When iPhone 7 Plus Camera Failure Repair

Last week, one of my customers asked me how to repair the damaged iphone  plus camara, after that, i told my engineer, he told me how to repair it, so i write this to help you to repair your iphone. This iPhone was repaired before, the previous phone repair shop repaired the iPhone WIFI module IC and U3301 iPhone audio IC. According to previous repair experience, we know there are 2 camera power supply transfer tube on the WIFI IC are easy to virtual weld, after remove it, and reinstall it, the failure still there.
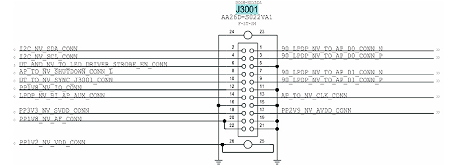
Use digital multimeter to measure the grounding resistance value for iPhone rear camera J3001 and J4501, the data is normal. And the power supply for camera socket tested also is normal.
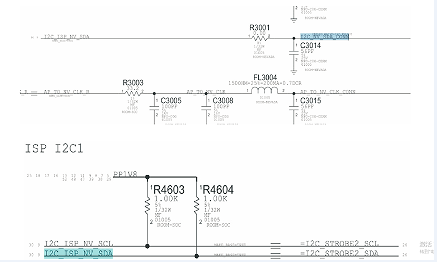
Measuring the I2C bus on J3001 and J450,when measured the J3001 2 pin, finding that it only has 0.4V voltage, but in the normal case, the normal voltage of I2C bus should be around 1.8V. Open the WUXINJI Dongle to check iPhone schematic diagram, this I2C bus via safety resistor R3301 to M2600, pull-up supplied by R4604 resistor.
Combine iPhone bitmap to find R4604 resistor.
One side of the resistance value measured of R4604 is normal, the other side is 0.4V, which is obviously wrong, we suspect the pull up resistor is damaged. With the help of the QUICK 861DW hot air rework station and tweezers, we replace the pull up resistor, and the measure it again, now the both sides voltage of resistor are back to normal.
Enter the systems and test it, the failure has been repaired!

Tuesday, 28 August 2018

How to Make Your Phone Work Well

We are now living in a new era when phone dominates, we can see a lot of smartphones in our daily life, so we cannot live well without a smart phone. For example, we love the apps stored in our handset, but how many of us think of booting the device periodically to ensure that it is not hung every now and then. For those who wish to make the best use of their much-coveted phones, here’s a sneak peek into the tips and tricks of smartphone protection and long term use.


Smartphones should be restarted often

With the advent of social media platforms, it is obvious that you will stay hooked to the phone every time. Basically, smartphones are mini size computers so a lot of memory is expended while you work on it. Doing that for a prolonged time requires a restart every time the programs are no longer running. Also, you can prevent few glitches that can lower down the overall performance of the phone.

Time lowers the functioning capacity

In other words, it is wise enough to accept that smartphone memory withers with time. Since operating systems are designed and updated with their fast processors, greater memory, high end cameras and the like, it is likely that performance will not be the same after some time. After all, the features need to be updated timely but even then it is not possible to have the same initial speed.

Be wary of covers and cases

While a lot of the emphasis is given on smartphone protection using covers and cases, problems are bound to arise with aftermarket cases. Not that they won’t offer good protection but accessing can pose a difficultly or the screens and buttons may become unresponsive after some time.

Video kills data allowance

If you wish to get the most of your phone, cut down on streaming music and games online. It’s better to resort to iphone Wi-Fi connection instead of normal data. This is primarily because these apps drain the phone’s memory considerably (like one HD movie can take up 700 megabytes of data).

Most shoppers are largely concerned about the smartphone model they wish to keep or flaunt before others. With these tips and tricks working good for many, it’s time the others will also act accordingly for rendering total smartphone protection and maintenance.

Monday, 27 August 2018

Why So Many People Choose to Use iphone X

iphone X is very popular all over the world, so there are many phone repair tools also open the phone repair shop all over the world. Is it the facial recognition feature and OLED technology used for the first time? Here is an overview of the iPhone X and its competitors.

1. Home Button
 
Not only the headphone jack is gone but also the home button. For Android phone users, they should be used to this kind of design already since the recent flagship Android phones, Samsung Galaxy S8 and LG G6 have both this same kind of feature already.
 
Tips: If you happens something wrong on phone home button by chance, before iPhone 8, there will be a convenience tool to fix it.
 
2. Phone front and Rear Camera
 
No doubt, the iPhone X has a more interesting camera than the Samsung Galaxy S8. It has a 12-megapixel, f/1.8 aperture for the main rear camera and the second rear camera allows optical zoom and Optical Image Stabilisation.


3. The Core of iPhone 10
 
Apple’s first internally-designed GPU, A11 Bionic, has some pretty serious performance that’s 25% better than the A10 which is a whopping 80% better in multi-core tests. Android phones don’t even come close.
 
4. Amazing Battery
 
The iPhone X supports the Qi standard for wireless charging, and some Android phones have already been using Qi for years so this is the first time you can use the same charger for both brands. Meanwhile, it can support wireless charge, so many manufacturer has produced many wireless charging station, but it is unfortunately for me to no chance to own it, cuz it is too expensive for me now.
 
What i am suprised is the above mentioned, no matter what it is, the new iPhone is the best all the time. However, it should depend on your economic situation, anyway, the decision is still for you to make.

How to Repair the iphone 6 Touch Screen

This post is about how to repair the damaged iphone 6 touch screen, so i write this post to make you know more clearly by this post

 
Now you can take a look at this guide to check your iPhone 6 Screen
 
1. Initial Screen Check
 
we will inspect the device to establish the level of damage to the iPhone. We will check the front camera, sensor and earpiece. And inspect the screen that if there are any bends or dents.
 
2. Removing Bottom Screws
 
we carefully remove the two bottom pentalobe screws with pentalobe screwdriver. These screws are on both sides of the charging port, and it can loosen the screen.
 
3. Removing the screen
 
We carefully remove the damaged iphone screen with a suction cup. It can eliminate damage internally of the iphone.
 
4. Removing the PCB Connector Plate
 
We need to remove the 5 screws from the connector plate very carefully. These tiny screws must stay in order, so as to put them back right position, when you assembling the phone.
 
5. Remove the 4 Connectors
 
We carefully remove the 4 connectors that includes the LCD connector, Touchscreen connector, Proximity, Earpiece connector and the Home Button connector. In the process, you can't damage one of the main connections. Now we have now fully removed the broken screen.
 
6. Remove the other Spare parts
 
We need remove the Earpiece, Camera, Proximity, Light sensor and Microphone Flex Assembly. We gently lift the front camera out of the way to remove the earpiece, proximity light sensor and the front camera. Next, remove the front facing microphone. These flexes are stuck down with viscous adhesive.  In a repair centre environment this can quickly be removed by applying heat.
 
7. Removing Home Button
 
Remove the 2 screws that hold the home button. The home button connects to a flex that runs throughout the device. If you slice into the flex, the touch ID will not work. To avoid this use a plastic tool to carefully disconnect it.
 
8. Remove the LCD Back Plate
 
When you remove the LCD Back plate, there has 7 screws that need carefully laying in order.
 
9. Reinstalling the LCD Back plate on the new screen
 
The LCD backplate will be reinstalled on the new screen with the 7 new screws.


10. Reinstalling Touch ID and Home Button
 
11. Reinstalling the Earpiece, Camera, Proximity, Light sensor and Microphone Flex Assembly on the new Screen
We install the proximity flex into the correct position using the plastic gaskets. This can enable to line up the proximity sensor with the light sensor. Once the proximity sensor is connected into the gasket it will hold itself into position for the earpiece flex then to be installed, it can make camera away from the screen. When you reinstall sensors you must payattention to the earpiece connectors. You can find 2 guide holes to make sure you are correct.
 
12. Connect the four connectors to the screen
 
We now line up the 4 connectors to the new screen. You must careful here not to bend the connectors.
 
13. Screen Test
 
We will now turn the screen on to test if it is working. We test this by dragging an app icon across the screen. If there are any dead pixels or spots the app jumps back to its original position.
 
14. Replacing the PCB Connector
 
We now put the PCB Connector plate back on, and put the middle screw back in place to hold the plate on. The screws are then carefully placed back in the order that they were taken out. We are careful not to over tighten the screws.
 
15. Install the new screen
 
The screen is gently clipped in the location clips and we reinsert the 2 Pentalobe screws into the phone next to the charging port. We complete this maintenance work.
 
16. Adding Mobile Phone film
 
We complete this maintenance work.